In our K2 applications, we sometimes need to use a Custom WorkList. There are different ways to create a Custom WorkList. In this article, we will show you how to do it using the K2 REST API. However, we won’t dwell on the presentation of the API and the creation of its methods. if you want to know this in detail, we invite you to read the following article Discovering K2 APIs.
Activating the Workflow REST API
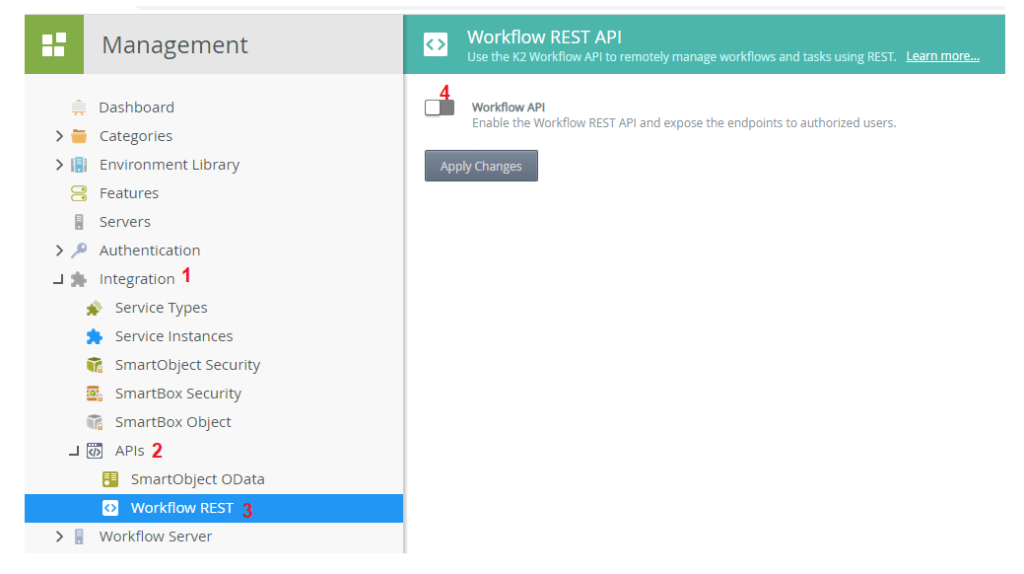
Activate the REST Workflow API by going to K2 Management: Integration -> APIs -> REST Workflow
Switch the control to activate the Workflow API, then click on the “Apply Changes” button. API is thus activated
Creation of API SmartObjects
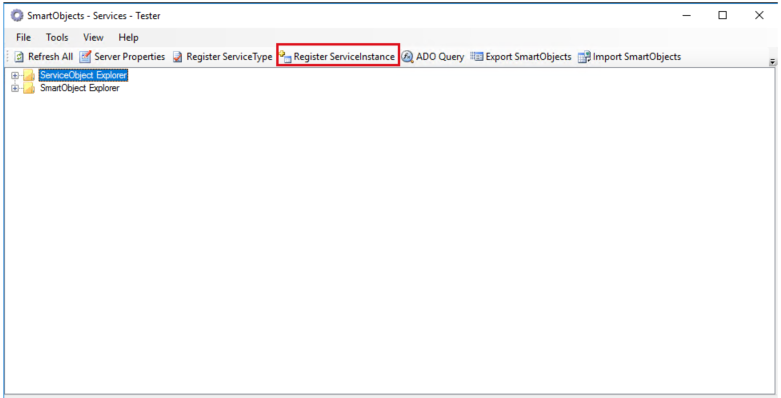
The creation of SmartObjects is done from the Services Tester or from K2 management. There, we will first create a Service Instance named Workflow API from the Service Type REST.
Click on Register ServiceInstance
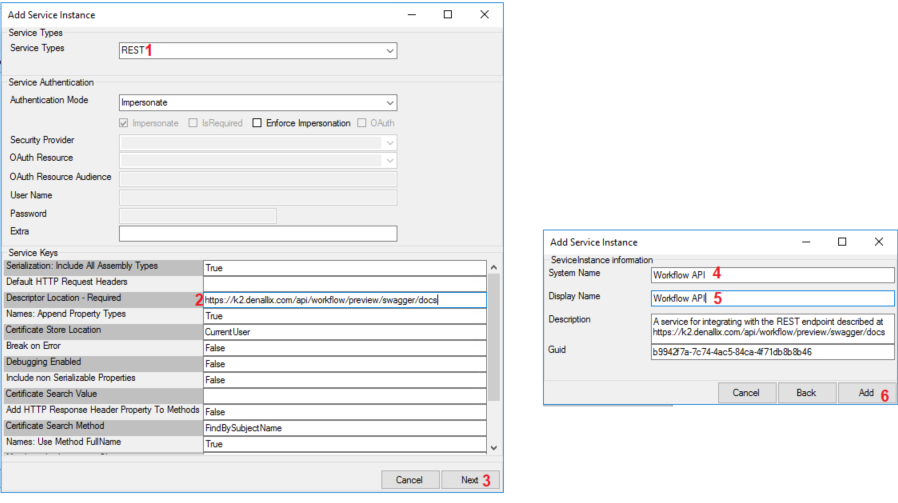
Choose the Service Type, fill in the link to the API descriptor (this field is mandatory) in our case, this is the link https://k2.denallix.com/api/Workflow/preview/swagger/docs. Then, click on Next.
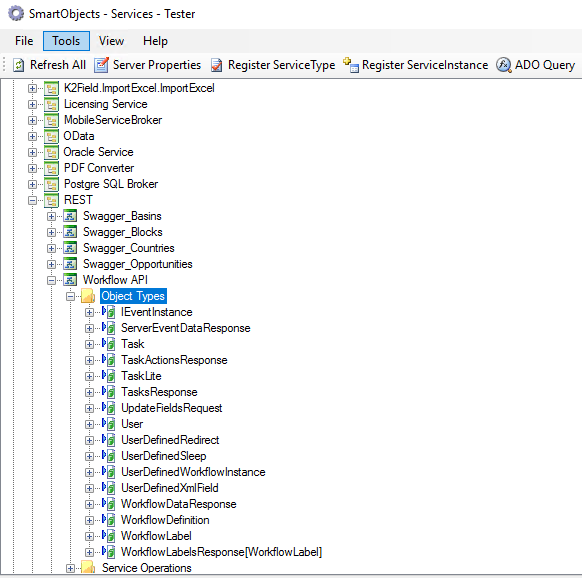
Fill in the name of the service as well as the display name and click on Add. You can see the different Objects created
Creating the Custom WorkList
In this part, we will set up our Custom WorkList. To do so, we will first create our SmartObject Task on which our future Custom WorkList will be designed. Indeed, this SmartObject will use the GetTasks method of the API which returns a serialized string that we will then deserialize.
After that, we will make the join between the SmartObject Task and the SmartObject Request (which is the main SmartObject where the columns to be displayed on the Custom WorkList are located), using the Worklow ID.
1- Creation of the SmartObject Task
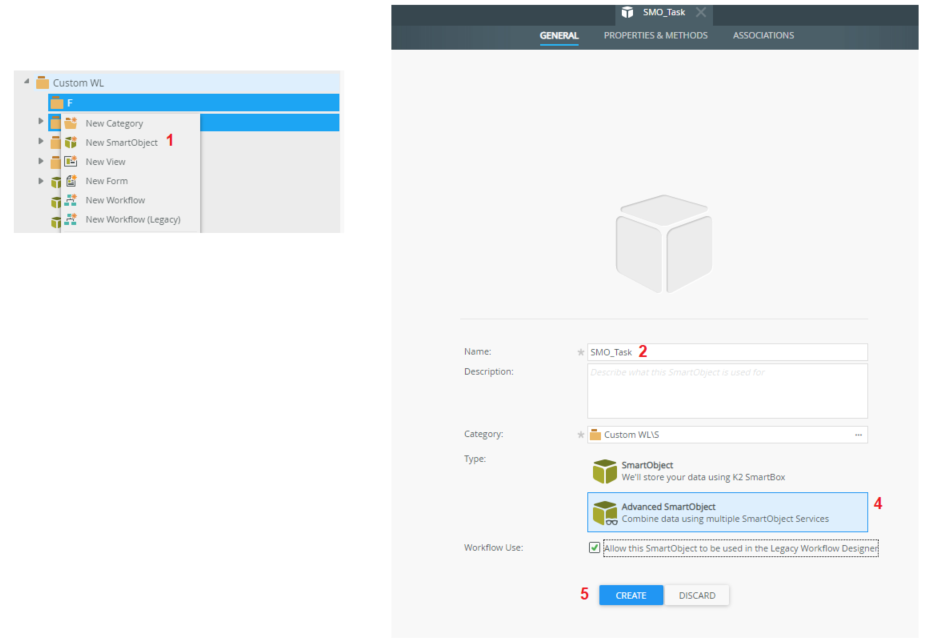
Go to the Designer, then create a new SmartObject as shown in the figure
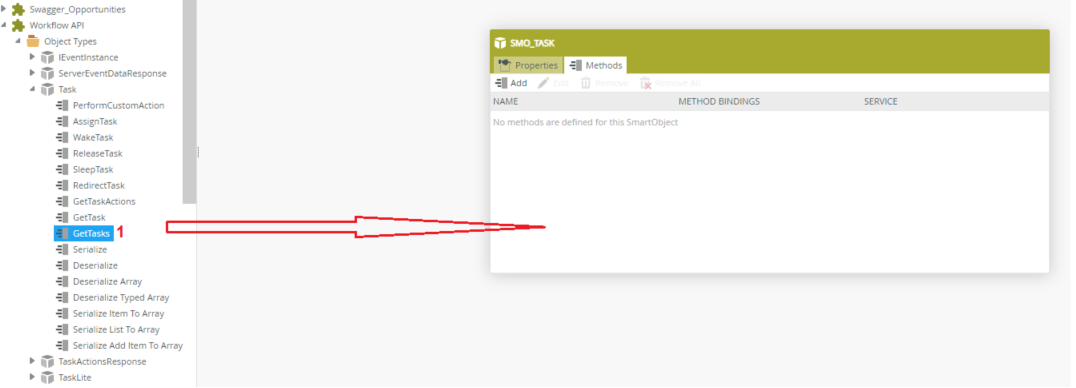
Drag and drop the GetTasks method from the API
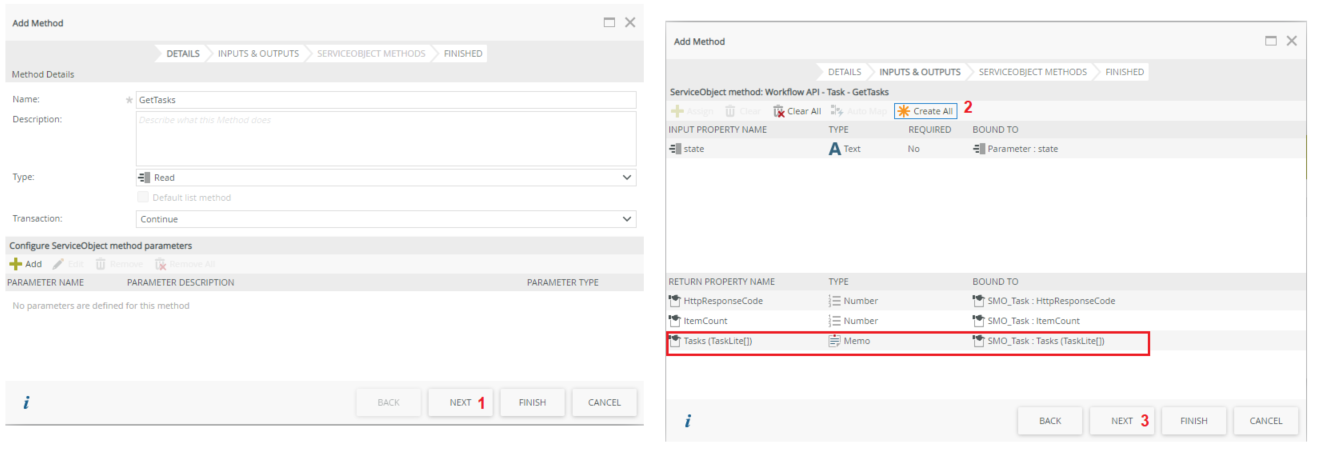
Click on Next, then do a Create All
We realize that in output, the GetTasks method does not return the information on the task in columns as we would have thought but rather an array of serialized strings of type TaskLite[ ]. That’s why we will add our second method Deserialize Typed Array that we will take from the SmartObject TaskLite of our Workflow API service instance.
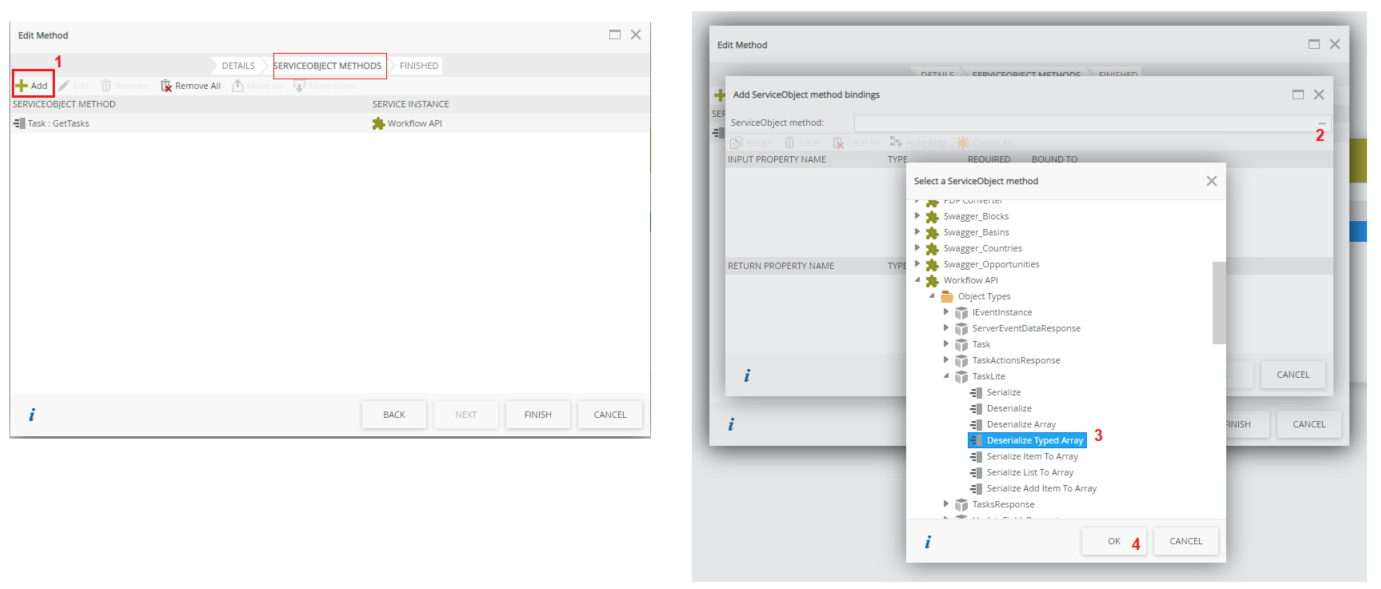
Click on Next,
Add this method by clicking on Add, navigate to choose the method as shown in the figure and click OK.
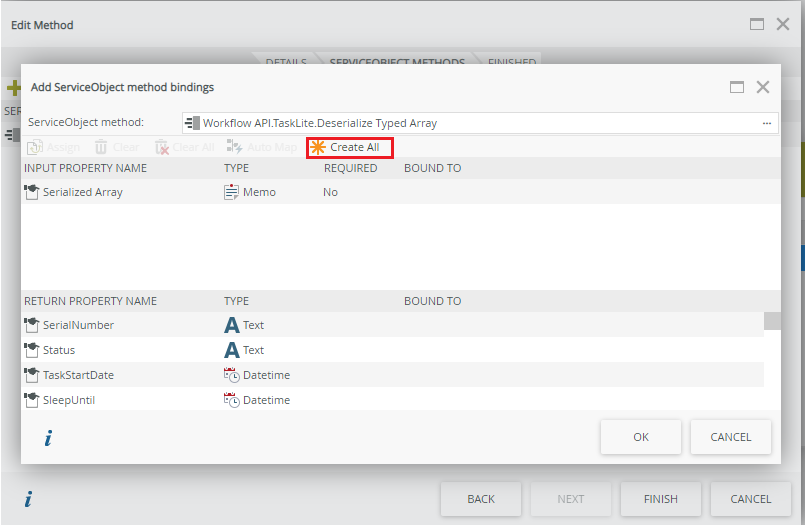
Then click on Create All. You can already see at the Return Property Name level, the different columns displaying the information on the task
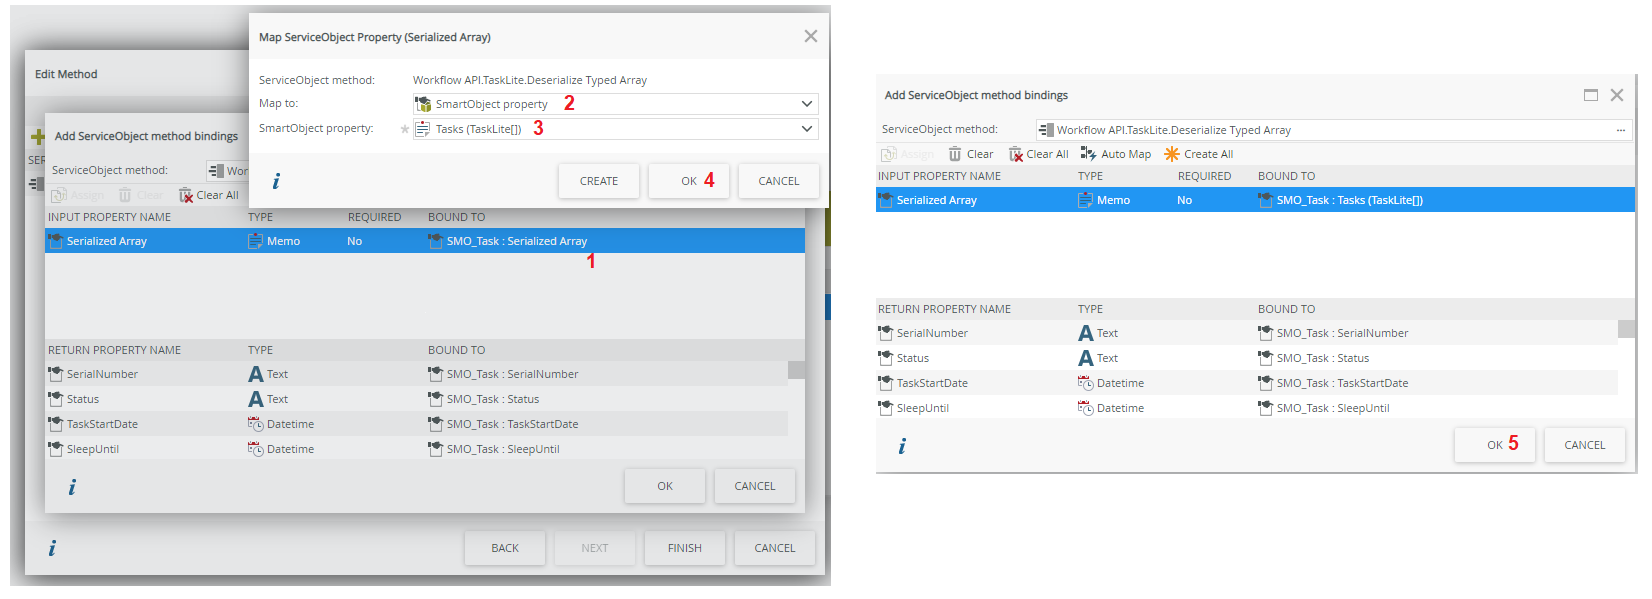
The Deserialize Typed Array method takes a Serialized Array as input. We will modify its mapping, to put the serialized string returned by the GetTasks method. To do this, double click on it and at the Map to level, choose SmartObject Property, then choose the Tasks(TaskLite[]) property.
Click on Ok and then on Ok to complete the mapping.
You can see the GetTasks method and Deserialize Typed Array are combined. They constitute what is called a chained method.
2- Configuration at the SmartObject level, which contains the columns to be displayed on the Custom WorkList
In our case, this is the SmartObject Request: it contains all the information related to a request when its process has started. We will first record the Workflow ID of each instance when it starts in this SmartObject, then we will create an association with the SmartObject Task.
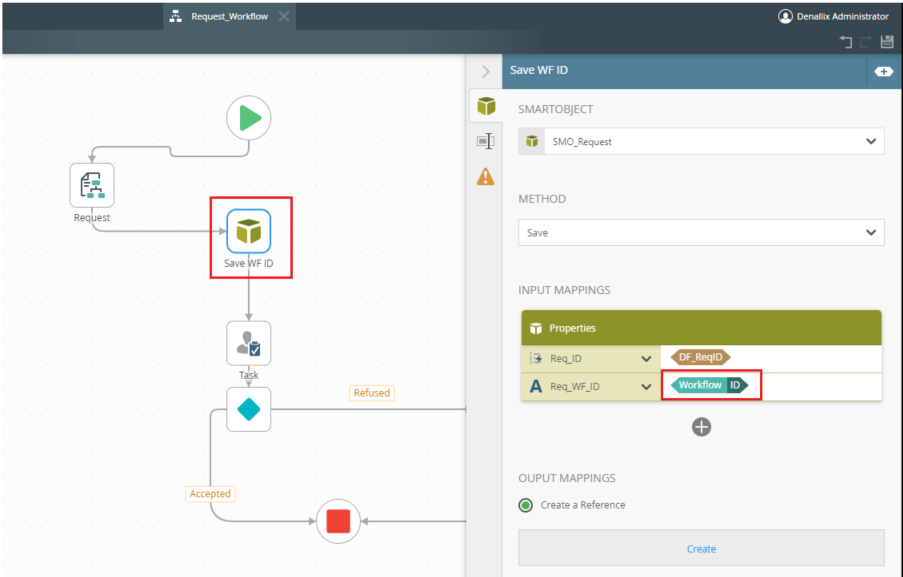
Firstly, in the WorkFlow at the beginning, save the WorkFlow ID. To do this, we would need to have a column in the Request table to save it.
Then deploy Workflow.
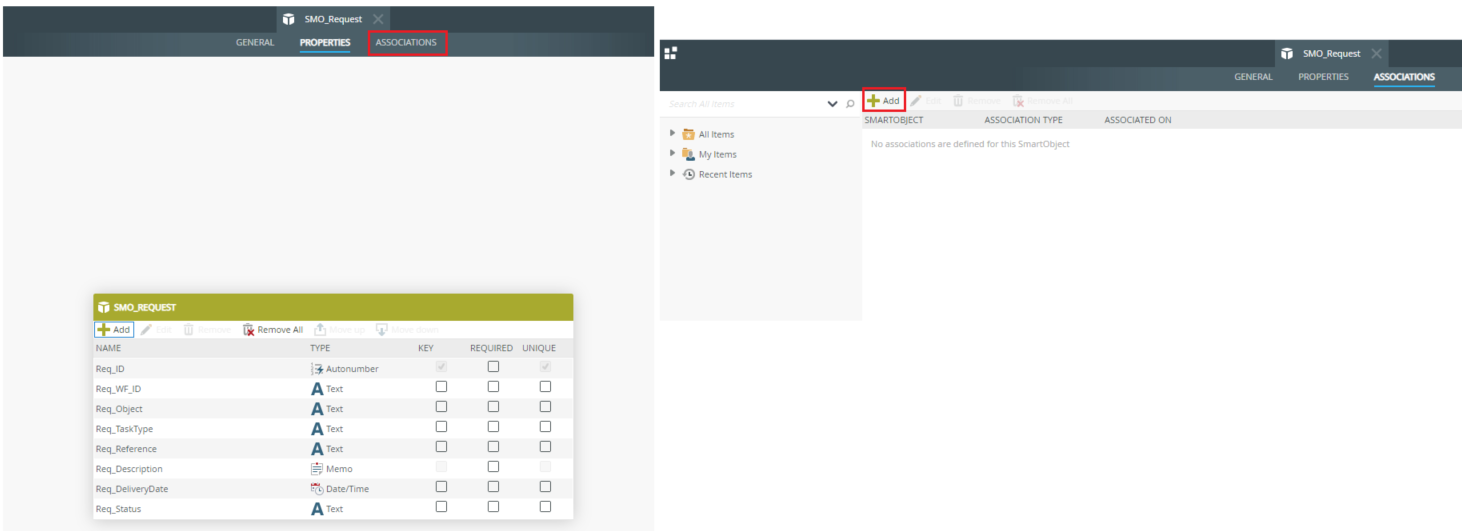
Go to the Designer and edit the SmartObject Request:
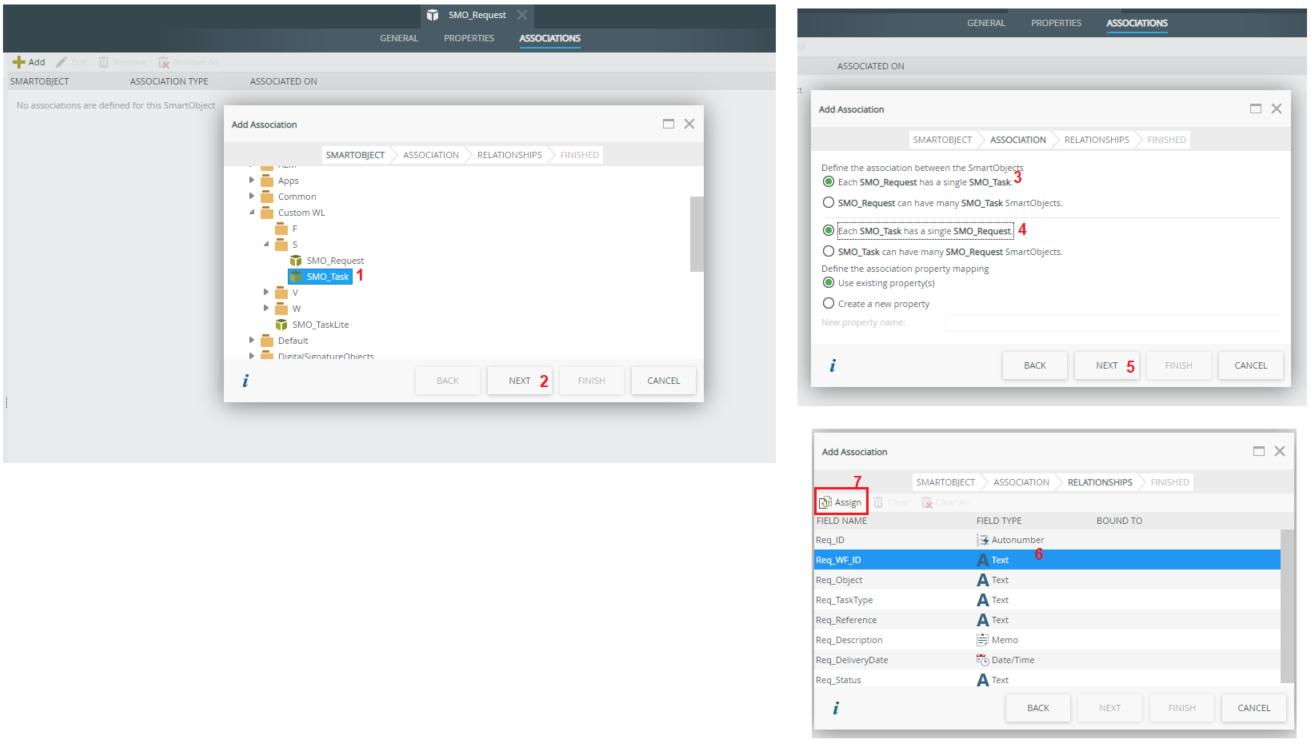
Click on the Associations tab -> Add
Navigate to select the SmartObject Task ->Next
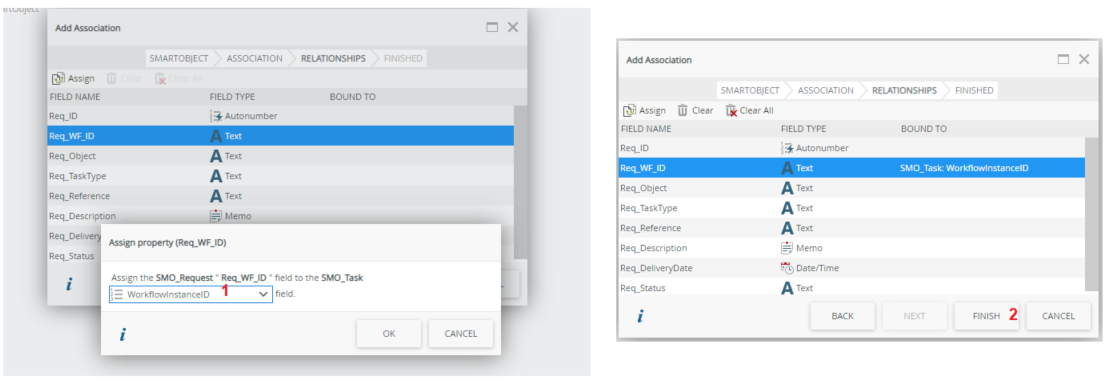
Choose the One to One association type as shown in the figure, and click Next -> Select the Req_WF_ID field -> Assign
Search the WorkflowInstanceID field of the SmartObject Task
NB: You should always make sure that this field contains effectively the WorkflowInstance ID (you can make a comparison between the values of this field and those of the Req_WF_ID field of the SmartObject Request). Because if this field doesn’t return the WorkflowInstance ID, the mapping won’t work.
Ok -> Finish -> Finish
3- Design of the Custom Worklist
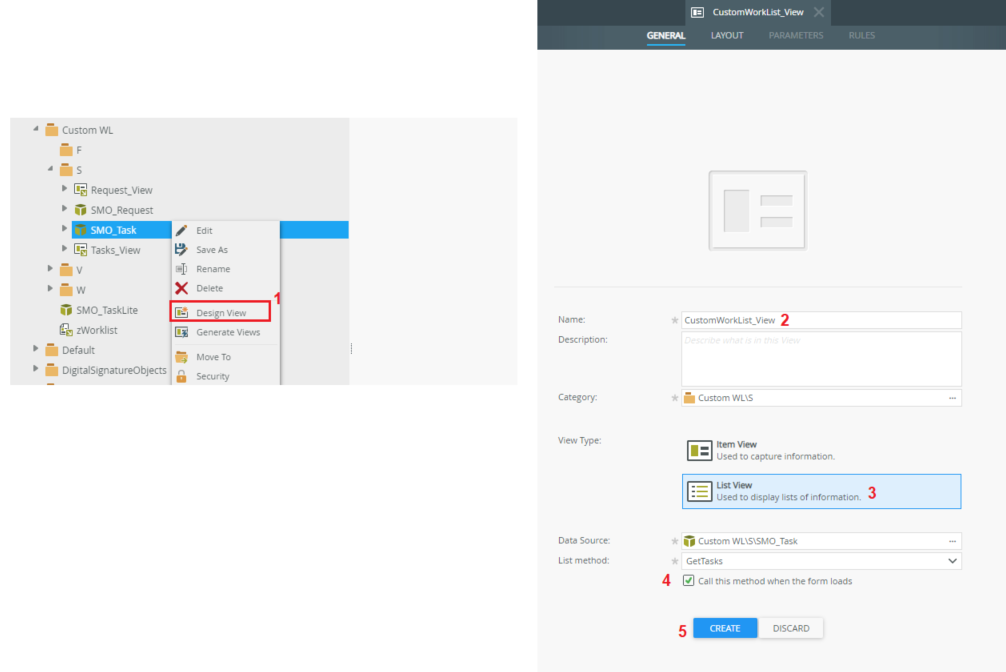
The time has come to design the Custom WorkList. To do this, go to the Designer->Right Click on the SmartObject Task -> Enter View Name -> Check List View -> Call this method when the form loads -> CREATE
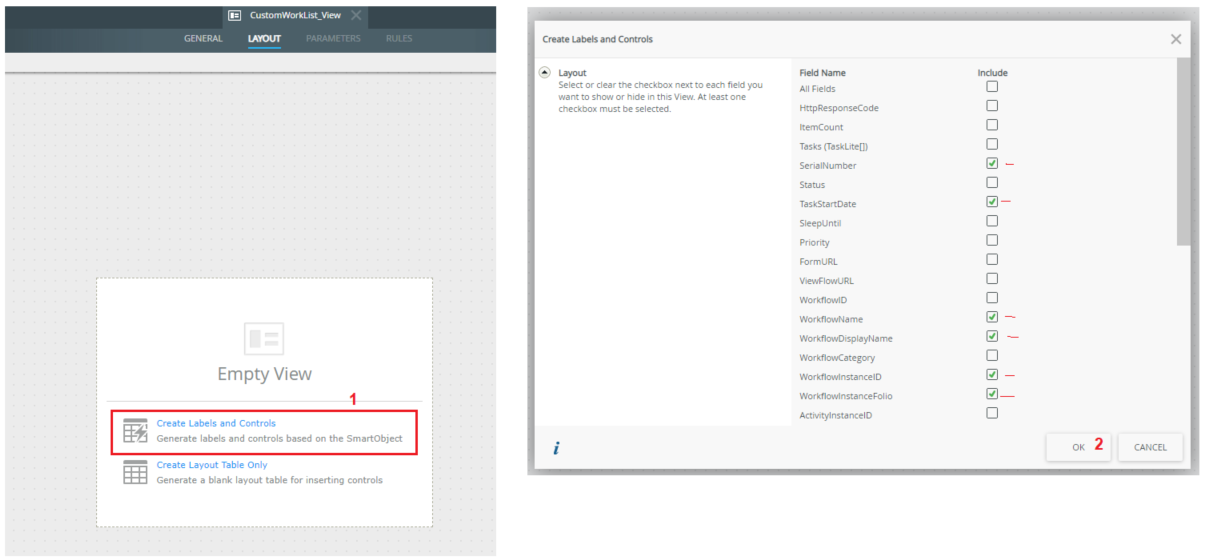
Create Labels and Controls -> Check all the fields you want to display on your WorkList -> Ok
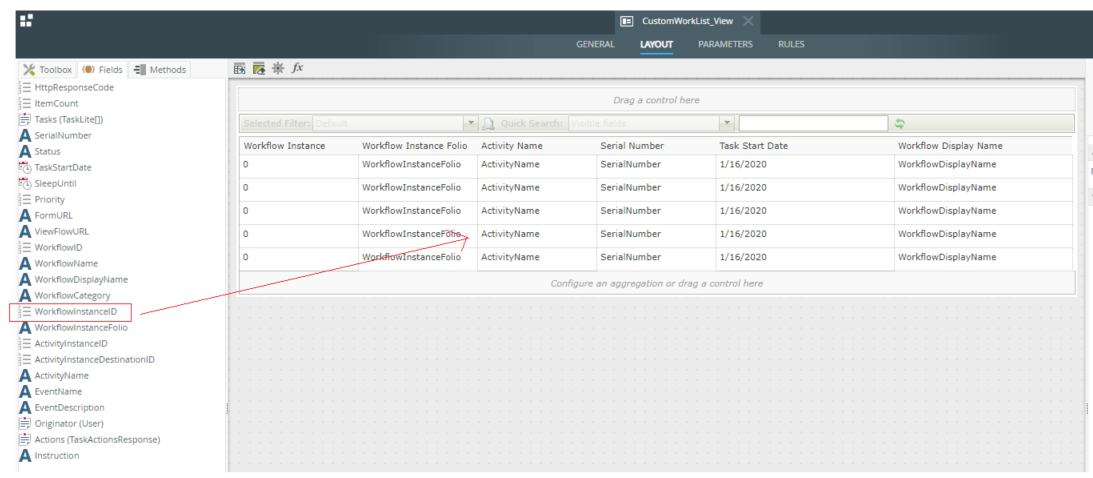
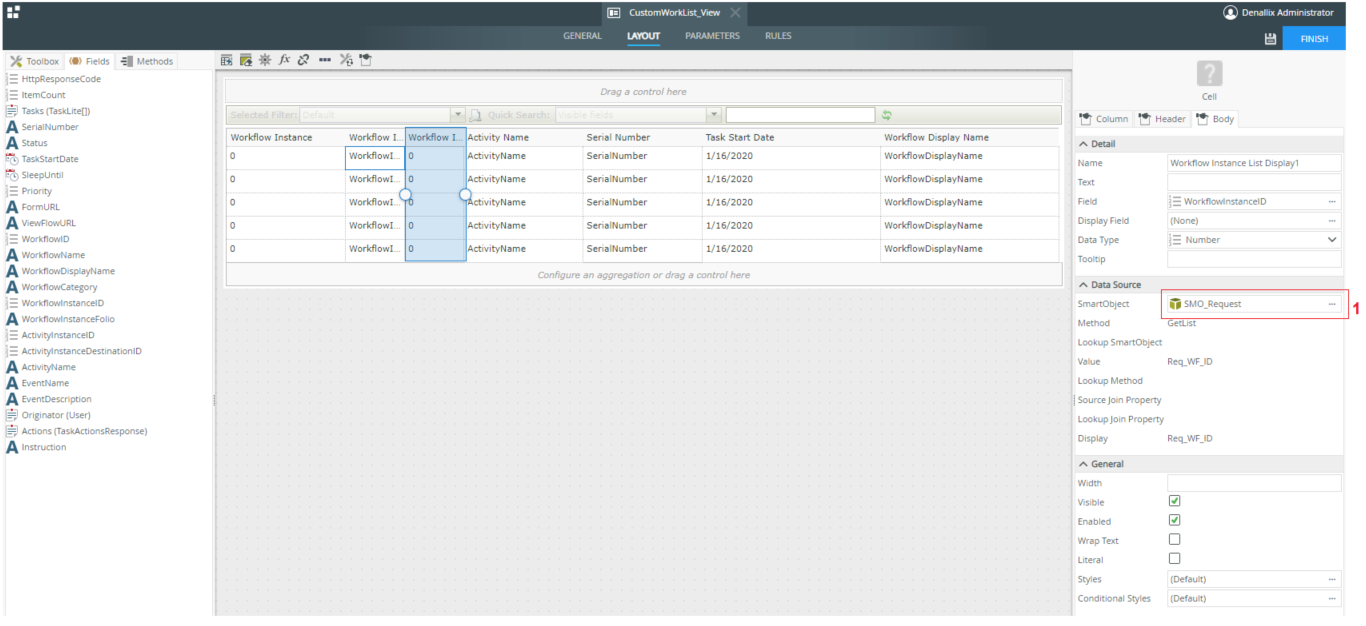
Now we will add the additional columns (those of the SmartObject Request): Carry and add to the view as a new column, the WorkflowInstanceID field.
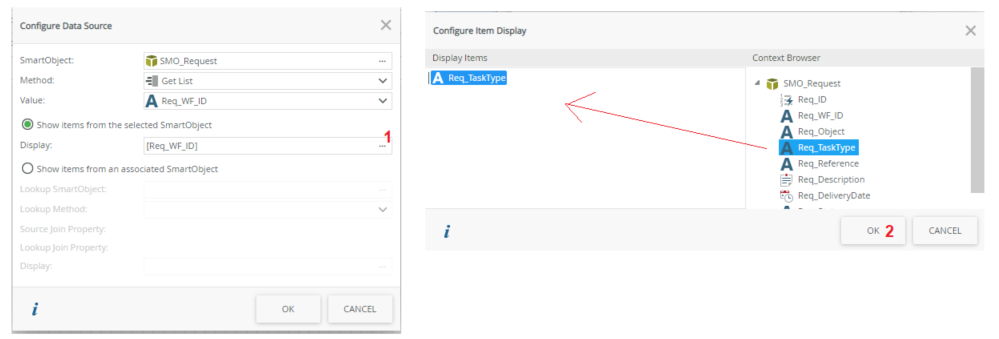
Right-click at the SmartObject level to configure
At Display level, select the column you want to display-> Ok -> Ok
Go to the Header tab and rename the column, then validate.
Do the same for all the columns of the SmartObject Request that you want to display on the Custom WorkList. However, in the Display Field configurations you choose the concerned column.
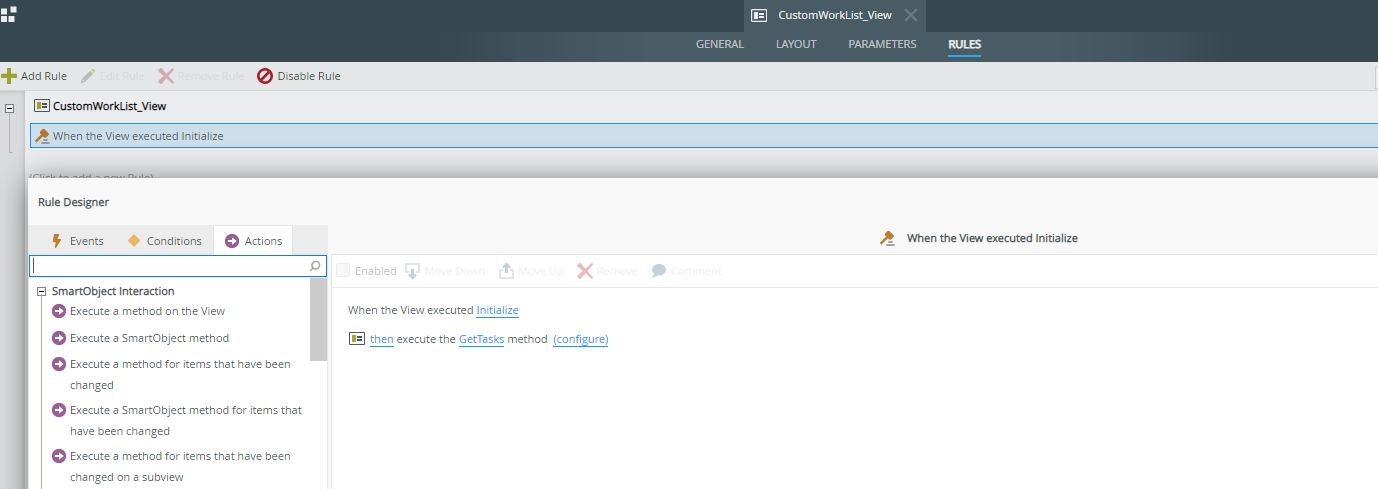
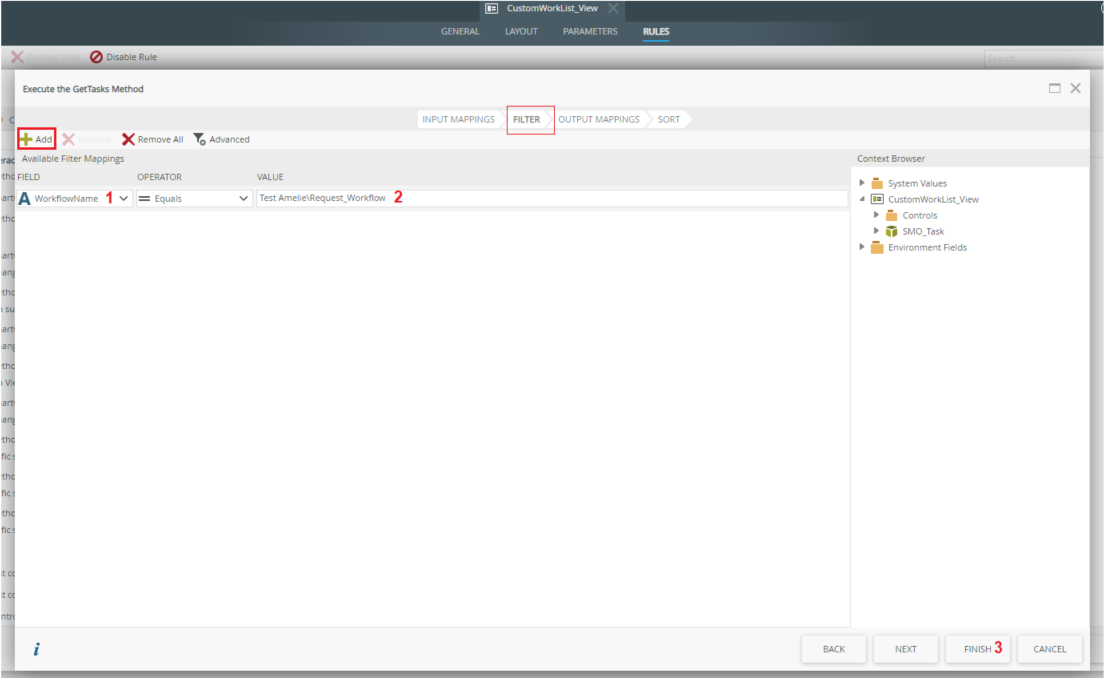
The last thing to do is to filter the WorkList according to the name of your Workflow. To do this, go to the Rules tab and open the rule “When the View executed initialize”
Click on configure of the GetTasks method
In the Filter tab -> Add -> choose the WorflowName field -> enter the full name of your Workflow (Workflow Name Path)
Note: To get the WorkflowName, you can add the WorkflowName column on your WorkList and run it to see.
Finish -> Ok -> Finish ->Check-in
Your Custom WorkList is already operational.
Now, start new instances and run the View. You will get something like this
We have framed in red the fields coming from our SmartObject Request.
That’s all for this article we hope you enjoyed it 🙂 and see you next time 😉
