
Did you know that a K2 administrator can control access to K2 objects (category, form, view and smartobject) and entities (user, group and role) by setting permissions (Allow and Deny) on rights (view, execute, modify and delete) ❓
Well, Authorization Framework is a feature in the new K2 Five and Cloud releases, which allows to do this. Hence the purpose of our article.
1- Briefing on K2 Authorization Framework
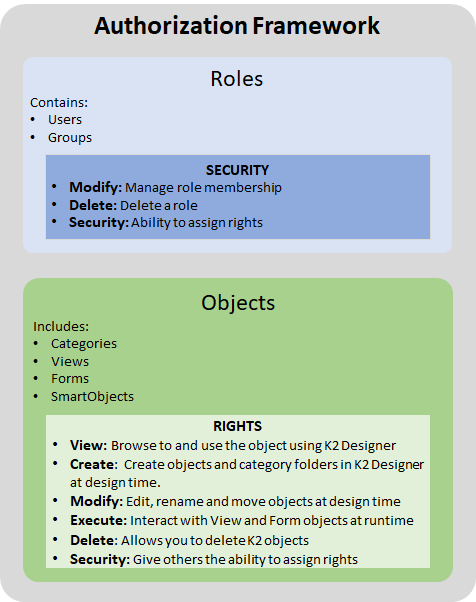
The authorisation framework is summarised in the management of Roles, the management of access to K2 Objects and security auditing:
- A Role can contain users and user groups: By default in K2 management there are 3 system roles created during the installation of K2. They cannot be deleted. You can add a role according to your needs. In the management -> Role -> Security you can decide who can delete or modify a role.
- The management of access rights on K2 objects determines who can view, execute, modify or delete a K2 object (category, form, view and smartobject).
- Security auditing is done through the SmartObject Security Audit: II allows a member of the Security Administrators role to run the SmartObject and generate an audit log of all security changes in your K2 environment.
For more details on the Authorization Framework, click on this link
2- Case Study
In a company for example we have several k2 applications classified by category/department. We would like to create roles (according to the departments of the company: IT, HR …). So that each user is only allowed to access the category of his department, and this only in view/execute mode. Then, one Admin Role per department that will have all rights on the department category (view, execute, modify and delete).
2-1- Creating the roles
Go to K2 management -> Users -> Roles -> New -> enter Role Name -> Add Users/Groups -> Confirm your choice -> Ok
Note: At the bottom of Find users you have the different search criteria.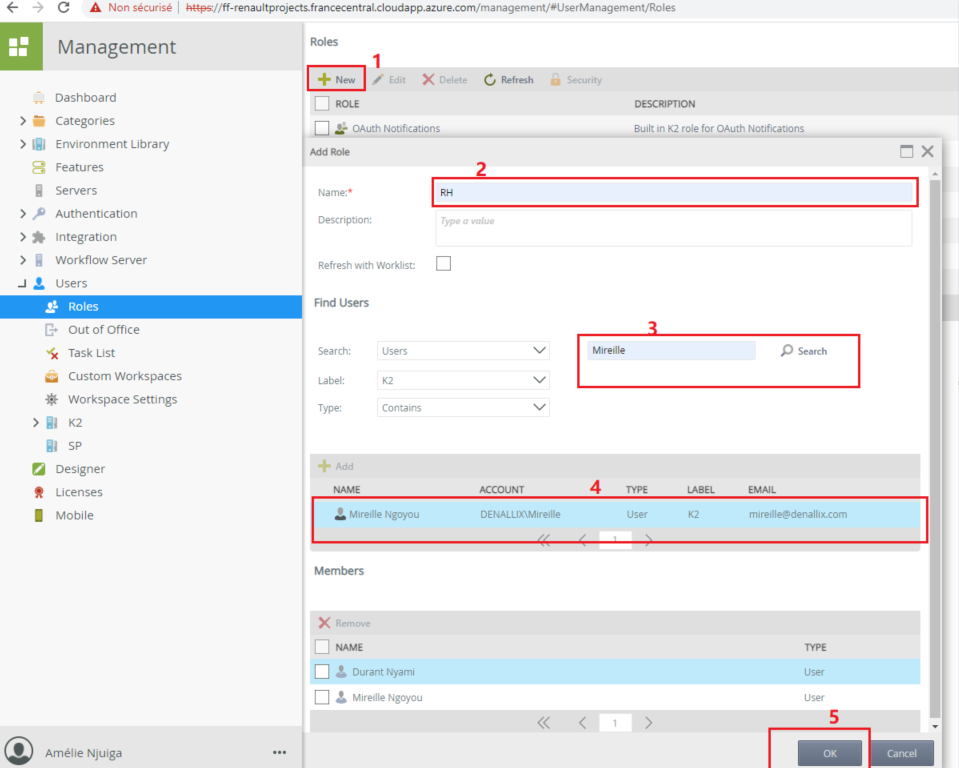
Do the same for all roles to be created including the Admin Roles of the different departments.
Once the roles are created you can modify the security: Who can delete or modify the roles or give permission to another user to assign the rights to this role (See point 4 -> Security).
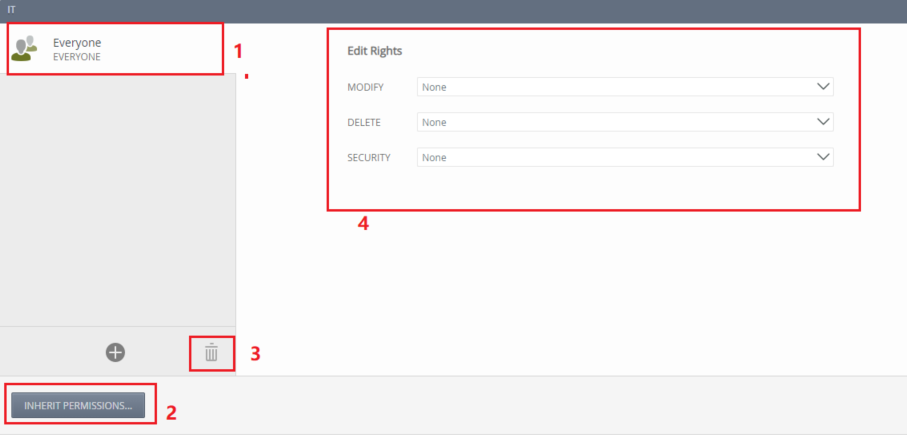
To change the rights: Select the Role -> Security as shown in the image below. Click on Everyone -> Break Inheritance which will change to Inherit Permissions. Delete the Everyone role, or set all its permissions to None (this will not appear later): In order to prevent any user from having rights on the IT Role.
So, for the moment only members of the Security Administrators role have full rights on this role.
Then click on Add (+) to add yourself in order to grant you the rights.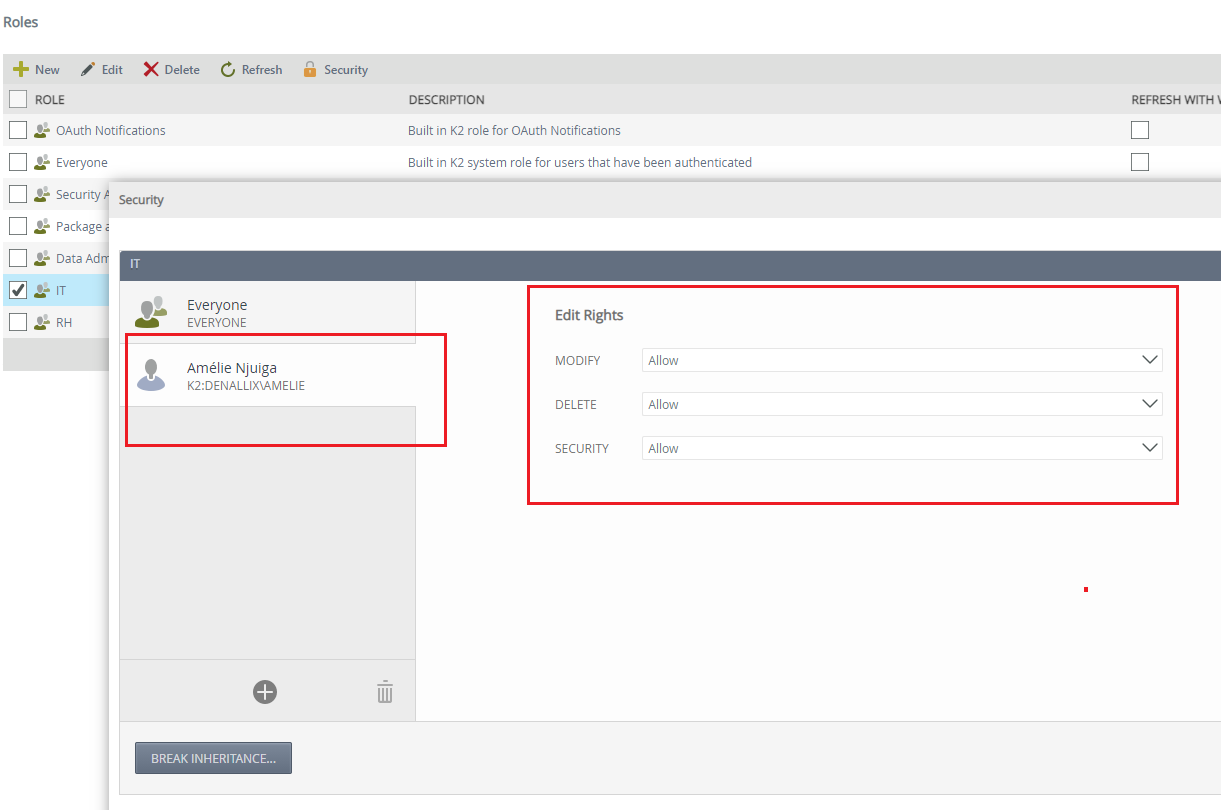
Note: In case of overlapping permissions, Deny wins, so for the Everyone role, we set it to none or delete it. The same applies to the category permissions. But this is not the case for the Security Administrators system group: they still have all the permissions and no way to assign or change a permission.
Example of permission nesting: The following configurations are made:
- Everyone (the user Eric is in the group) => Modify : Deny
Add user Eric => Modify : Allow
Result: Eric will not have edit access
2-2- Assigning rights to categories
1- Presentation
The configurations are as follows:
- IT role -> IT category access (view, execute)
- HR Role -> HR Category Access (view, execute)
- IT Admin Role -> IT Category Access (view, run, edit and delete)
- HR Admin Role -> IT Category Access (view, run, edit and delete)

The rest of the configurations, will be done only with the IT Role, IT Admin on the IT category, and for the others, you will do the same.
2- Permission assignments on the IT category
Go to K2 Management -> Category -> IT -> Security -> Everyone -> Break Inheritance -> remove the Everyone role (to prevent any user from accessing the IT category)
Note: Click on Break Inheritance to prevent the category from inheriting the permissions of the parent category

Adding IT Role Permissions: Search and add IT role
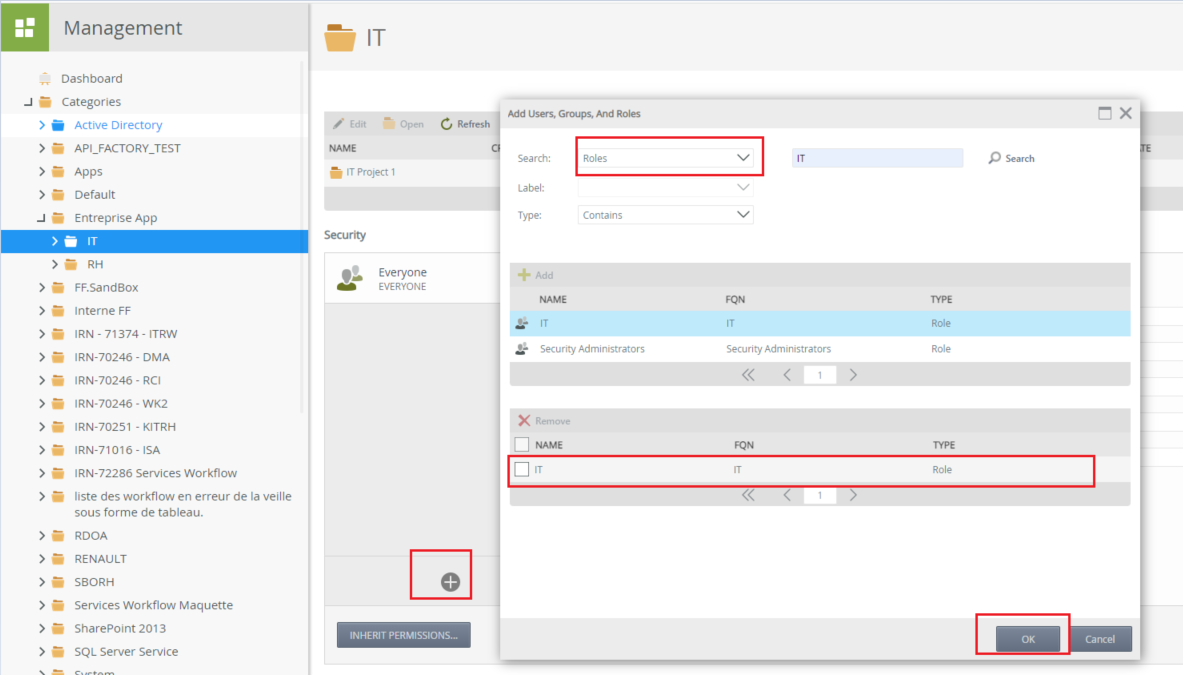
IT rôle members only have view and execute permissions.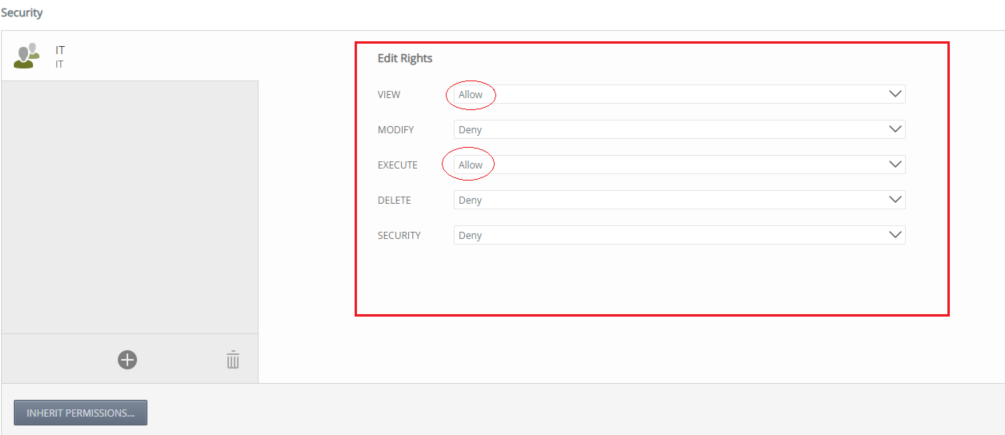
Add the IT Admin Role permissions (view, run, edit and delete) as in this image:
Note: Security allows you to decide if you want to allow a user/Group/Role to assign rights to this category

Well, the configurations are complete, so let’s test.
2-3- Tests
Here we are testing access to the IT category and its sub-elements. For this purpose, we have provided three users for the different roles
- Amelie => IT Admin
- Yannick => IT
- Durant = > RH
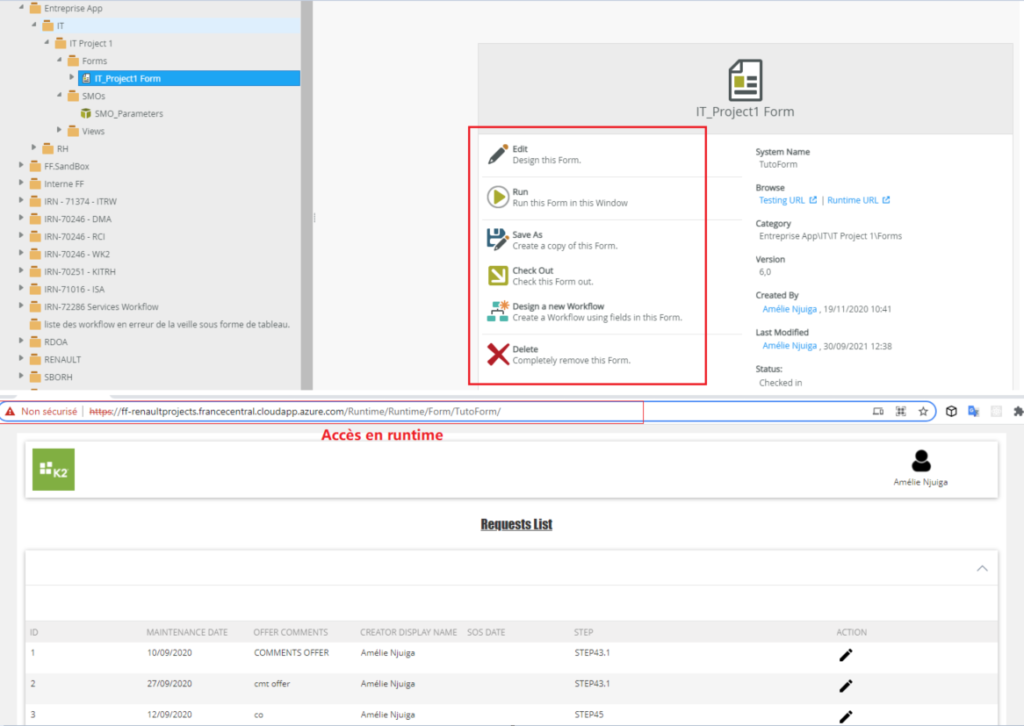
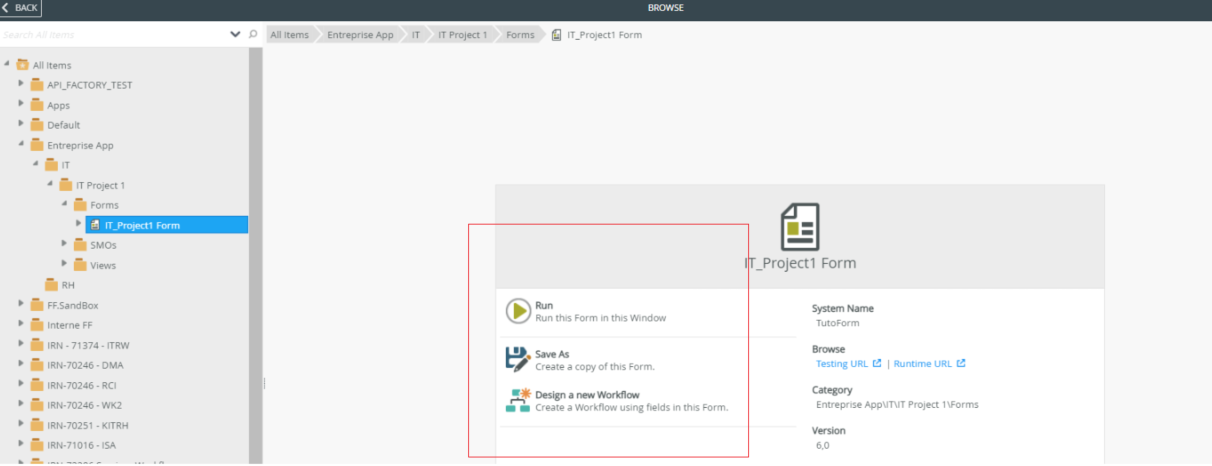
Now connect with the three users in turn and try to access the IT category (and its sub-elements) via Designer, Runtime, Management and Workspace (In this article, the forms of our test applications are not integrated in the workspace, so we will not do this test. In this article, the forms of our test applications are not integrated in the workspace, so we will not do this test. By the way, the customization of the Workspace will be the subject of a future blog post). As a result we have :
- Amelie has all the rights: (view, run, edit and delete)
- Yannick has the right to read and execute only

- Durant: has no access and the IT category is not displayed in his session


That’s it for this article, I hope you are now ready to secure your K2 application 🙂 .
See you later 😉
Links consulted for this article :
- https://help.nintex.com/en-US/k2cloud/userguide/Update_14/content/AuthorizationFramework/Authorization-Framework-Overview.htm#Rights
- https://help.nintex.com/en-US/k2five/userguide/5.0/default.htm#K2_Management_Site/User_Management/Roles.htm
- https://www.enk2besoin.com/2017/11/07/k2-five/
- https://www.enk2besoin.com/2017/12/12/k2-five-authorization-framework/